Graphical User Interface#
Our graphical user interface (GUI) is quite costly in terms of computation. So we emphatically recommend that you properly configure the hardware acceleration of your graphics card. If you still have performance issues make the window as small as possible. The smaller the window is the less is the processing cost.
The SSR GUI tries to enable samplebuffer support to enable anti-aliasing of the screen output. It will tell you if it didn’t work out. Check Fig. 4.1 to get an idea of the influence of anti-aliasing. One day we will also implement a variable frequency for the screen update so that you can slow it down if CPU load is too high. Of course it won’t look as nice then.

No anti-aliasing on the left image.#
Screen shot of the SSR GUI.#
General Layout#
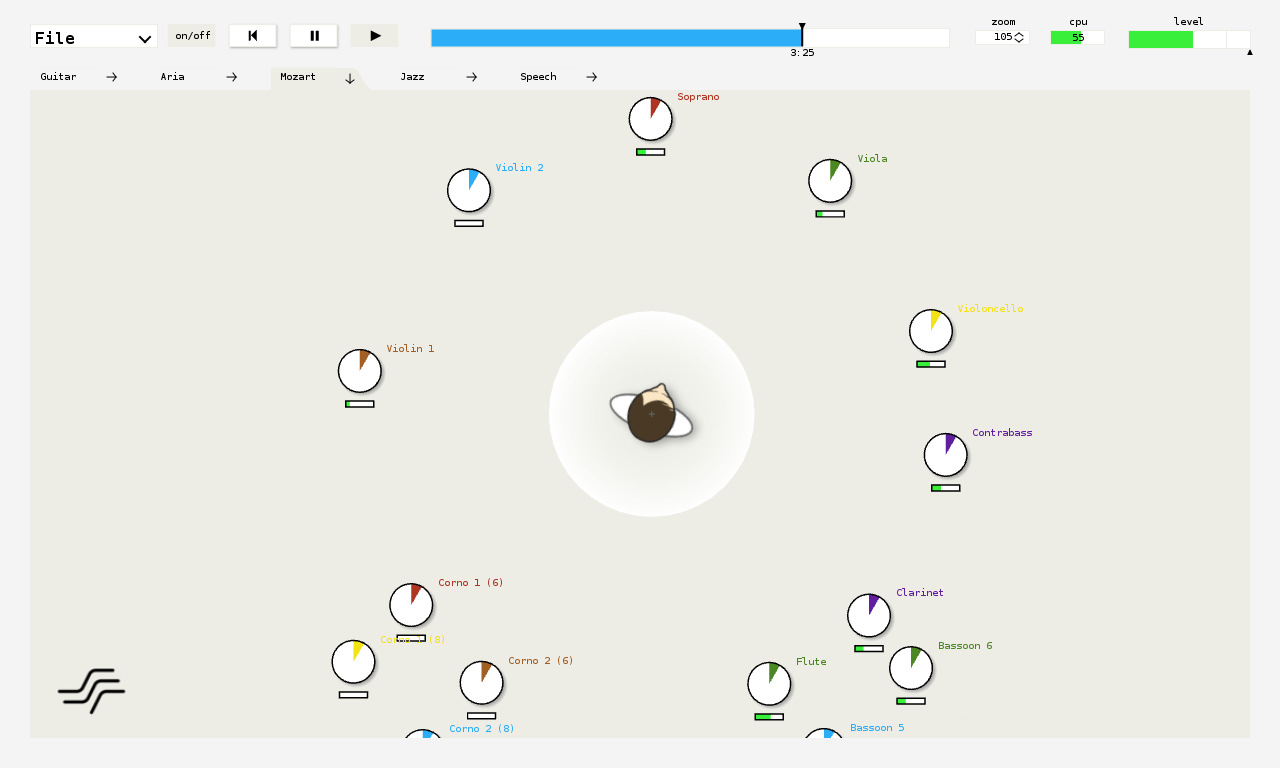
The graphical user interface (GUI) consists mainly of an illustration of the scene that you are hearing and some interaction tools. The renderer type is indicated in the window title. See a screen shot in Fig. 4.2.
On the top left you will find the file menu where you can open files, save scenes, and quit the application. So far only the save scene as… option is available. That means every time to save the current scene you will be asked to specify the file name. This will be made more convenient in the future.
Next to the file menu, there is a button which lets you activate and deactivate the audio processing. Deactivating the audio processing does not necessarily lower the CPU load. It means rather that the SSR won’t give any audio output, neither for involved audio files nor for live inputs.
Next to the processing button, you find the transport section with buttons to skip back to the beginning of a scene, pause replaying, and continue/start playing. Note that pausing a scene does not prevent live inputs from being processed. To prevent audio output switch off processing (see above). You may also replay while processing is switched off to navigate to a certain point in time in the respective scene.
In the top middle section of the GUI there is the audio scene time line. By default, it shows a time interval of two minutes duration. Whenever the progress exceeds the displayed time interval the latter is shifted such that the progress is always properly indicated. Below the handle, there is a numerical indication of the elapsed time with respect to the beginning of the scene. See Sec. Mouse Actions for information on how to operate on the time line.
To the right of the time line there’s the CPU load gauge. It displays the average CPU load as estimated by the JACK audio server on a block-wise basis. Further right there’s the label to indicate the current zoom factor in percent.
And finally, on the top right you find the master level meter combined with the master volume fader. The colored bar indicates an estimation of the relative maximum audio level in dB, also updated block-wise. The left boundary of the meter is at -50 dB; the right boundary is at +12 dB. The black triangle below the colored bar indicates the master volume in dB. Click somewhere into the widget and the master volume gets additionally displayed as a number. Note that this meter displays full scale, i.e. above 0 dB clipping and thus distortion of the output signal occurs! 0 dB is indicated by a thin vertical line.
In the row below the transport section, you occasionally find some tabs
giving fast access to a number of scenes. These tabs can be defined in a
file. By default, the file scene_menu.conf in the current working
directory is assumed; there is also an option to specify the file name
in the SSR configuration file. Refer to
Sec. Configuration-File. The configuration
file for the tabs may contain something like the following:
# This file configures the menu for the scene selection.
#
scenes/dual_mono.asd Guitar######### comments are possible
scenes/jazz.asd Jazz
scenes/rock.asd Rock
#scenes/speech.asd Speech
scenes/live_conference.xml live conference
The syntax is as follows:
Everything after a hash symbol (
#) in a line is ignored.A valid entry consists of the path (relative or absolute) to ASDF file (or pure audio file) followed by space and a short keyword that will be displayed on the respective tab on the screen.
Of course, also audio files can be specified instead of .asd files. Note
that so far, no syntax validation is performed, so watch your typing. We
furthermore recommend that you keep the keywords short because space on
the screen is limited. Note also that only those tabs are displayed
which fit on the screen.
The SSR always tries to find the file scene_menu.conf in its current
working directory (or at the location specified in the SSR configuration
file). If is does not find it no tabs will be displayed in the GUI. So
you can have several of such files at different locations. We have added
an example in folder data/.
The main part of the screen is occupied by the graphical illustration of the scene that you are hearing. The orientation of the coordinate system is exactly like depicted in Fig. 1.1. I.e., the \(x\)-axis points to the right of the screen, the \(y\)-axis points to the top of the screen. The origin of the coordinate system is marked by a cross, the reference is marked by a rhomb. The direction “straight in front” is typically assumed to be vertically upwards on the screen, especially for binaural techniques. We do so as well. Note that in this case “straight in front” means \(\alpha = 90^\circ\) and NOT \(\alpha=0^\circ\).
In Fig. 4.2 you see a number of sound sources with their individual audio level meters (combined with their individual volume sliders) underneath. The left hand boundary of the level meter is at -50 dB; the right hand boundary is at 0 dB. Spherical sources don’t have any additional decoration. The wave front and propagation direction of plane waves are indicated.
You also see icons for the loudspeakers of the current rendering setup (if the currently applied technique employs any).
Mouse Actions#
The GUI is designed such that the most important functionalities can be accessed via a touch screen. Thus, it mostly employs ‘left clicks’ with the mouse.
The use of the file and transport section is rather intuitive so we won’t further explain it here. The time line can be used to jump to a certain position within the sound scene and it also shows the progress of the scene. Click into the white/blue area of the time line in order to jump to a specific point in time, or drag the handle to fast forward or rewind. Left-clicking to the right of the time line skips forward by 5 seconds, left-clicking to the left of the time line skips back by 5 seconds. Double-clicking on the time line skips back to the beginning of the scene. Right-clicking on the time line opens an input window in order that you can numerically specify the time instant to jump to (refer to Sec. Keyboard Actions).
You can change the zoom either by clicking into the zoom label and dragging up or down for zooming in or out. Alternatively, you can use the mouse wheel [1]. Clicking and dragging on the background of the screen lets you move inside the scene. A double-click brings you back to the default position and also defaults the zoom.
Clicking and dragging on a sound source lets you select and move it. Note that you cannot directly manipulate the propagation direction of plane waves. It’s rather such that plane sources always face the reference point. To change their direction of incidence move the plane wave’s origin point to the appropriate position. Right clicking [2] on a sound source opens a window that lists the properties of the source such as position, volume, etc. Refer to Fig. 4.3 and Sec. Source Properties Dialog.
A right mouse click on the scene background [3] lets you select multiple sound sources via a rubber band.
If you hold the Ctrl key pressed during any mouse action then you
operate on all selected sound sources at the same time (i.e. mute, move,
etc. them).
Click on the SSR logo and you’ll see the About the SSR information.
Source Properties Dialog#
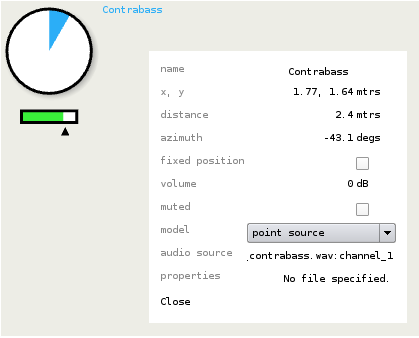
Source properties dialog#
The source properties dialog can be accessed via a right click on a
source and shows information about the actual state of the selected
source. Its main purpose is to provide the possibility of an exact
positioning of sources. The properties fixed position, muted and
model can be changed. Refer to Fig.
4.3 to see the complete list of properties
this dialog shows.
Drag & Drop of Scenes#
You can also drag & drop scenes (or audio files) into the GUI to open them. Currently, you can only drag & drop one single file.
Keyboard Actions#
A number of keyboard actions have been implemented as listed below. Recall that also some keyboard actions are available when the SSR is run without GUI (refer to Sec. Running SSR).
+/-: if no sound source is selected: raise/lower master volume by 1dB, otherwise raise/lower the selected sources’ volume by 1dBArrow up/down/left/right: navigate in sceneSpace: toggles the play/pause stateBackspace: skip to beginning of sceneReturn: calibrate tracker (if present). When pressed, the instantaneous orientation is assumed to be straight forward (i.e. 90:math:^circ azimuth)Ctrl: when pressed, multiple sound sources can be selected via mouse clicks or operations can be performed on multiple sources simultaniouslyCtrl+Alt: individual sound sources can be deselected from a larger selection via a mouse click or the rubber bandCtrl+a: select all sourcesf: toggles the position-fix-state of all selected sound sources (sources which can not be moved are marked with a little cross)m: toggles the mute state of all selected sound sources (muted sources are displayed with a grey frame instead of a black one)p: toggles the source model between plane wave and point sourcer: toggles whether or not all sources are always automatically oriented toward the reference.s: if no source selected: unsolos all potentially soloed sources, otherwise: solos selected sound sources.Shift+s: solo in place, unsolos all other sources.Ctrl+s: opens the save scene as… dialogF11: toggles window fullscreen state1-9: select source no. 1-90: deselect all sourcesCtrl+c: quitCtrl+t: open text edit for time line. The format ishours:mins(2digits):secs(2digits)wherebyhours:andhours:mins(2digits):can be omitted if desired.Esc: quit